Blog
Educational articles covering cutting-edge Fullstack trends, UI design strategies, and practical coding techniques to empower your web development skills.

Building Simple CRM with Vue: Establishing Secure Sign Up Page Using Firebase Authentication
Welcome to the next phase of Vue CRM development, where we delve into the creation of essential components – Login and Sign Up pages. In this tutorial, we'll not only guide you through the process of crafting these crucial user authentication interfaces but also show you how to seamlessly integrate them with Firebase Authentication. By harnessing the power of Firebase Auth, we unlock a realm of benefits for securing user interactions in our Simple CRM. Let's embark on this journey to establish secure Login and Sign Up pages, leveraging the capabilities of Vue.js and Firebase Authentication.Here is our plan for today's work:1. Building Auth Layout and Configuring Nested Routes in Vue-Router2. Designing Sign-Up Page in Vue.js with Vuetify3. Creating the First Pinia Store4. Firebase Authentication Integration in Vue CRMOkay, we have a plan so let's stop talking and start working!1. Building Auth Layout and Configuring Nested Routes in Vue-RouterVuetify gives us ready-to-use forms that we can use in our sign-up or login page development, luckily those forms are going with popular validation libraries "Vee-Validate" and "Vuelidate" which simplify our work even more. Also, we can use only inputs and create our forms, I think we will use this variant in building "create products functionality".So, let's create a new AuthLayout inside the layouts folder and add simple layout styles with a router-view template.<template> <div class="main__content"> <router-view /> </div> </template> <script> export default { name: 'AuthLayout' }; </script> Now, we need to modify our router settings, set additional layouts for auth pages, and add our sign-up page. For that import all pages and components inside the index.js file in the router folder and update routes similar to our MainLayout. The final version of my vue-router file:import { createRouter, createWebHistory } from 'vue-router'; import MainLayout from '../layouts/MainLayout.vue'; import AuthLayout from '../layouts/AuthLayout.vue'; import SignUp from '../views/SignUp.vue'; import Dashboard from '../views/Dashboard.vue'; const router = createRouter({ history: createWebHistory(import.meta.env.BASE_URL), routes: [ { path: '/', component: MainLayout, children: [ { path: '', component: Dashboard }, ], }, { path: '/auth', component: AuthLayout, children: [ { path: 'sign-up', component: SignUp } ], }, ] }) export default router We can check updates, launch the dev server, and check "auth" with "sign-up" route. We will see an empty sign-up page but it's ok, more important that all our layouts and routes are configured correctly.2. Designing a Sign-Up Page in Vue.js with VuetifyNext step, create the SignUpForm component in the components folder and check the forms section in Vuetify documentation. There is a part with a vee-validate example, copy that example and paste it inside the SignUpForm component, do not forget to copy scripts also. Then add some more fields that we would like users to fil them with personal data.<template> <form @submit.prevent="submit"> <h3 class="mb-5">Sign Up</h3> <v-text-field v-model="name.value.value" :error-messages="name.errorMessage.value" label="Name" ></v-text-field> <v-text-field v-model="phone.value.value" :error-messages="phone.errorMessage.value" label="Phone Number" ></v-text-field> <v-text-field v-model="email.value.value" :error-messages="email.errorMessage.value" label="E-mail" ></v-text-field> <v-text-field v-model="password.value.value" :error-messages="password.errorMessage.value" label="Password" ></v-text-field> <v-text-field v-model="repeatPassword.value.value" :error-messages="repeatPassword.errorMessage.value" label="Repeat Password" ></v-text-field> <v-btn class="me-4" type="submit" > Sign Up </v-btn> <v-btn color="indigo-darken-3" variant="flat"> Already have an account? </v-btn> </form> </template> <script setup> import { ref } from 'vue' import { useField, useForm } from 'vee-validate' const { handleSubmit, handleReset } = useForm({ validationSchema: { name (value) { if (value?.length >= 2) return true return 'Name needs to be at least 2 characters.' }, phone (value) { if (value?.length > 9 && /[0-9-]+/.test(value)) return true return 'Phone number needs to be at least 9 digits.' }, email (value) { if (/^[a-z.-]+@[a-z.-]+\.[a-z]+$/i.test(value)) return true return 'Must be a valid e-mail.' }, password (value) { if (value?.length >= 8) return true return 'Password needs to be at least 8 characters.' }, repeatPassword (value) { if (value === password.value.value) return true return 'Password and Repeat Password values should be equal.' }, }, }) const name = useField('name') const phone = useField('phone') const email = useField('email') const password = useField('password') const repeatPassword = useField('repeatPassword') const submit = handleSubmit(values => { console.log('submit'); }) </script> And wait a minute, we need to install Vee-Validate into our project, just use "npm i vee-validate".Great, now import our Form directly inside the SignUp.vue component that we need to create in the views folder, and restart the project.Once again thank you "UI Verse" for fantastic free UI examples, with their help I added some styles to my sign-up page. Here is the result:


Let's Develop a Fullstack Blogging CMS from Scratch using React.js and Node.js
After completing my first series of articles on 'Building a Simple CRM with Vue' I was thrilled by the positive feedback and engagement it received. Encouraged by this response, I'm excited to start a new journey with you all. In this series, we'll dive into the world of React.js and Node.js to develop an awesome blogging Content Management System. My aim is to offer a comprehensive guide that not only introduces beginners to the intricacies of React and Node development but also equips seasoned developers with valuable insights.In this article, we'll lay the groundwork for our blogging platform project. We'll discuss the selection of the technology stack, outline the project structure, and delve into other preparatory steps. Whether you're looking to enhance your portfolio or hone your development skills, I believe this series will provide ample opportunities for growth and learning. Let's embark on this exciting journey together!Let's define a small plan for today's article:1. Exploring Project Design2. Selecting and Implementing Project Structure and Functionality3. Determining Technology Stack (React, Redux, Node, Express, MongoDB)Okay, we have a great idea of the future project but also we have a lot of jobs to do, so let's move on and start from design.1. Exploring Project Design and FunctionalityWhen starting a new project, it's crucial to have a clear vision of your app's functionality and design. This entails more than just conceptualizing; it requires meticulous planning to ensure the final product meets your expectations. To achieve this, we must meticulously craft a design that not only meets but exceeds our needs. This involves defining the primary colors, menus, and overall structure of our application to create a cohesive and user-friendly experience.Hours spent on searching for the correct or similar design you need completed successfully. It's not crucial and each of you can use whatever design you like, and I would be grateful if you could share with me your final results. I think I found the design version I like the most and planning to build something close to it. It is called "Soft UI Dashboard" and it is available for free. I will not use its source files, only try to reproduce their colors and styles.

Smart Content Management: Integrating Search, Filters, and Pagination with React and Node.js
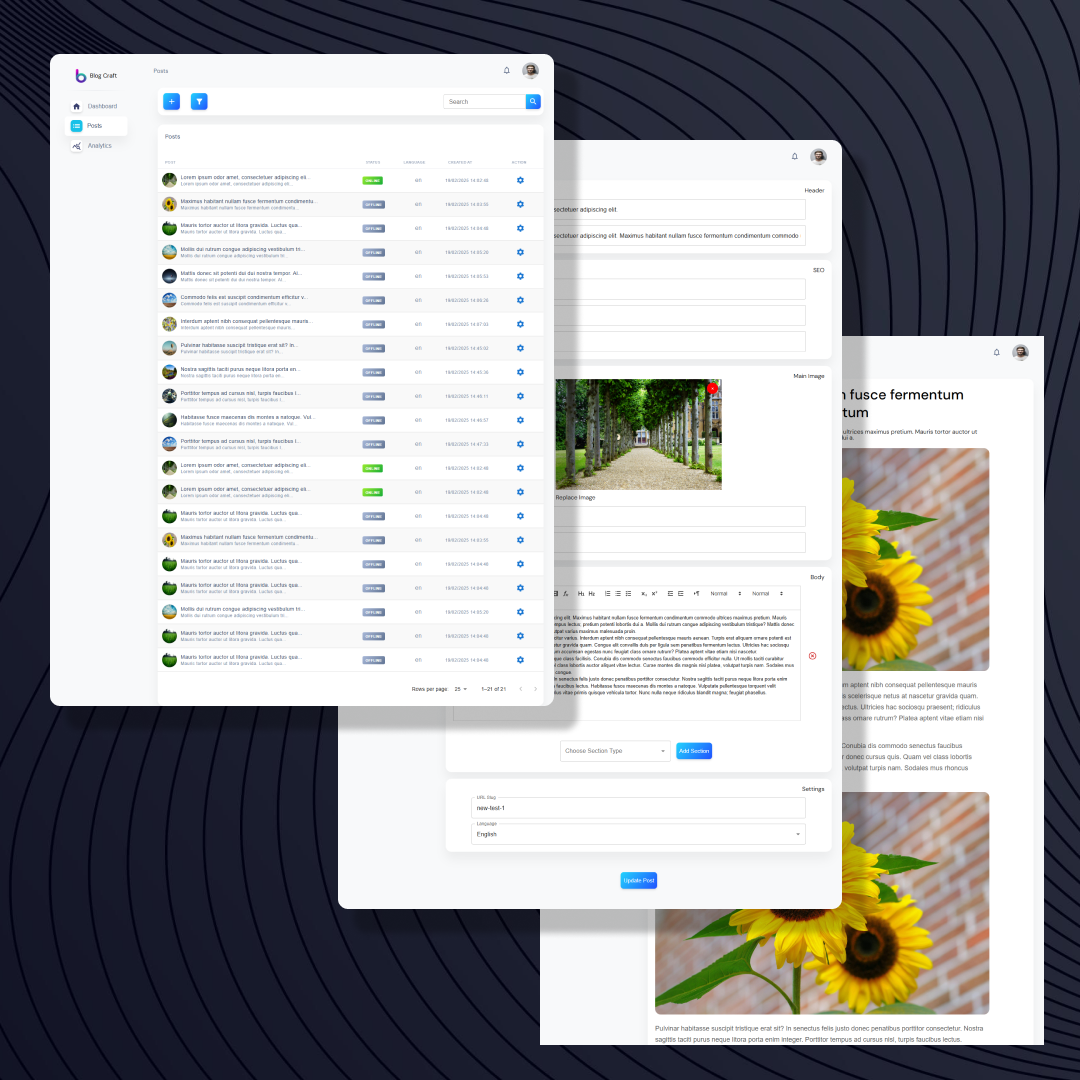
In one of our previous tutorials, we implemented a table-based interface to display our posts, organizing content across different columns including an 'Actions' column that enabled basic CRUD operations. Now it's time to enhance our CMS with more advanced features to improve user experience: search capabilities, filtering options, and pagination. These features must be implemented at both the backend and frontend levels to ensure smooth, efficient operation. Let's begin by setting up the server-side infrastructure needed to support these new functionalities.1. Building the Backend Foundation: Search, Filter, and Pagination InfrastructureOkay, for pagination we will need to get from the frontend page number and rows per page; for search, we will get a string (we will search in titles and subtitles); for filters, we will wait for status, language, and date range (you can add any filters you need). Great, now we can start with the posts controller.- we will wait for additional data from the URL query, and in this case, we need to modify the "getPostsList" function. Get all the data that we mentioned earlier from the request value, setting default values where it is possible. Send those values as params into our model, and return as a response all the data to the client;async function getPostsList(req, res) { try { const { page = 1, rowsPerPage = 10, status, language, startRangeFilter, endRangeFilter, search } = req.query; const data = await postsModel.getPostsList({ page, rowsPerPage, status, language, startRangeFilter, endRangeFilter, search }); return res.status(200).json({ status: 200, ...data }); } catch (error) { console.error('Error getting posts list:', error); return res.status(500).json({ status: 500, message: 'Internal server error' }); } } - open our "posts.model.js" file and find the "getPostsList" function;- we need to add new checkers and filters, and modify our main query;async function getPostsList({ page = 1, rowsPerPage = 10, status, language, startRangeFilter, endRangeFilter, search }) { try { // Converts rowsPerPage to a number (limit), which determines how many posts to fetch per request. // Converts page to a number and calculates skip, which determines how many posts to skip before retrieving data. const limit = parseInt(rowsPerPage, 10); const skip = (parseInt(page, 10) - 1) * limit; const query = {}; // If status is provided and not 'all', it is added to the query, status.trim() removes extra spaces. if (status && status !== 'all' && status.trim()) { query.status = status.trim(); } // If language is provided, it is added to the query. if (language && language.trim()) { query.language = language.trim(); } // If both startRangeFilter and endRangeFilter are provided, it filters posts where the created.date falls within the range ($gte means greater than or equal to, $lte means less than or equal to). if (startRangeFilter && startRangeFilter.trim() && endRangeFilter && endRangeFilter.trim()) { const [startDay, startMonth, startYear] = startRangeFilter.trim().split('-').map(Number); const [endDay, endMonth, endYear] = endRangeFilter.trim().split('-').map(Number); query['created.date'] = { $gte: { day: startDay, month: startMonth, year: startYear, }, $lte: { day: endDay, month: endMonth, year: endYear, } }; // If only startRangeFilter is provided, it filters posts from that date onward. } else if (startRangeFilter && startRangeFilter.trim()) { const [startDay, startMonth, startYear] = startRangeFilter.trim().split('-').map(Number); query['created.date'] = { $gte: { day: startDay, month: startMonth, year: startYear, } }; // If only endRangeFilter is provided, it filters posts up to that date. } else if (endRangeFilter && endRangeFilter.trim()) { const [endDay, endMonth, endYear] = endRangeFilter.trim().split('-').map(Number); query['created.date'] = { $lte: { day: endDay, month: endMonth, year: endYear, } }; } // If search is provided, it performs a case-insensitive search ('i' flag) on title or subTitle. if (search && search.trim()) { const searchRegex = new RegExp(search.trim(), 'i'); query.$or = [ { title: searchRegex }, { subTitle: searchRegex } ]; } // The function fetches: // - postsList: Retrieves paginated posts from the database based on the query. // - totalCount: Gets the total number of posts matching the filters. // Both queries run in parallel using Promise.all(), improving performance. const [postsList, totalCount] = await Promise.all([ posts.find(query).skip(skip).limit(limit), posts.countDocuments(query) ]); // The function returns an object containing: // - posts: The list of fetched posts. // - totalCount: The total number of matching posts. return { posts: postsList, totalCount }; } catch (error) { console.error('Error getting posts list:', error); throw error; } } And that's it, we prepared our server for additional functionality, and now can move to the frontend part.2. Crafting the User Interface: Implementing Interactive Search and Navigation ComponentsIt was fast with the backend and now let's jump into the frontend part, but previously, please, create a few more posts for testing purposes.- modify the "getPostsList" function from the "posts.services.js" file that we use to call the "posts" endpoint;export const getPostsList = (data, query) => { const params = new URLSearchParams(); // URLSearchParams is a built-in JavaScript object used to build a URL query string. params.set('page', query?.page || 1); params.set('rowsPerPage', query?.rowsPerPage || 10); // If query.page is provided, it's set; otherwise, it defaults to 1. // If query.rowsPerPage is provided, it's set; otherwise, it defaults to 10. if (query?.status) params.set('status', query.status); if (query?.language) params.set('language', query.language); if (query?.search) params.set('search', query.search); if (query?.endRangeFilter) params.set('endRangeFilter', query.endRangeFilter); if (query?.startRangeFilter) params.set('startRangeFilter', query.startRangeFilter); // If these filters exist in query, they are added to params. const queryString = params.toString(); //Converts params into a URL-encoded query string return HTTP.get(`/posts?${queryString}`, data).then(({ data }) => data); // Sends a GET request to posts?{query parameters}. // Uses HTTP.get, which is an Axios instance. // .then(({ data }) => data) extracts data from the response. }; - we will store all the filters and search fields data in the "Redux" storage, in that case, we need to add additional functionality and state values to the "posts" storage;// new state values totalPostsCount: 0, postsPage: 0, postsPerPage: 10, statusFilter: 'all', languageFilter: null, startRangeFilter: null, endRangeFilter: null, searchFilter: '', // new reducer cases case POST_ACTION_TYPES.SET_TOTAL_POSTS_COUNT: return { ...state, totalPostsCount: payload }; case POST_ACTION_TYPES.SET_POSTS_PAGE: return { ...state, postsPage: payload }; case POST_ACTION_TYPES.SET_POSTS_PER_PAGE: return { ...state, postsPerPage: payload }; case POST_ACTION_TYPES.SET_STATUS_FILTER: return { ...state, statusFilter: payload }; case POST_ACTION_TYPES.SET_LANGUAGE_FILTER: return { ...state, languageFilter: payload }; case POST_ACTION_TYPES.SET_START_RANGE_FILTER: return { ...state, startRangeFilter: payload }; case POST_ACTION_TYPES.SET_END_RANGE_FILTER: return { ...state, endRangeFilter: payload }; case POST_ACTION_TYPES.SET_SEARCH_FILTER: return { ...state, searchFilter: payload }; //new selectors export const sTotalPostsCount = (state) => state.post.totalPostsCount; export const sPostsPage = (state) => state.post.postsPage; export const sPostsPerPage = (state) => state.post.postsPerPage; export const sStatusFilter = (state) => state.post.statusFilter; export const sLanguageFilter = (state) => state.post.languageFilter; export const sStartRangeFilter = (state) => state.post.startRangeFilter; export const sEndRangeFilter = (state) => state.post.endRangeFilter; export const sSearchFilter = (state) => state.post.searchFilter; //new types SET_TOTAL_POSTS_COUNT: 'post/SET_TOTAL_POSTS_COUNT', SET_POSTS_PAGE: 'post/SET_POSTS_PAGE', SET_POSTS_PER_PAGE: 'post/SET_POSTS_PER_PAGE', SET_STATUS_FILTER: 'post/SET_STATUS_FILTER', SET_LANGUAGE_FILTER: 'post/SET_LANGUAGE_FILTER', SET_START_RANGE_FILTER: 'post/SET_START_RANGE_FILTER', SET_END_RANGE_FILTER: 'post/SET_END_RANGE_FILTER', SET_SEARCH_FILTER: 'post/SET_SEARCH_FILTER', - apply "Search" functionality to our "Search" field inside the "PostsAction.component.jsx" file. Add the "onClick" event to the "Search" button, create a new "applySearch" function that will send all necessary params to the endpoint, and update our "posts list" with data from the response;const applySearch = async () => { try { const response = await getPostsList({}, { page: 1, rowsPerPage: postsPerPage, status: statusFilter, language: languageFilter, search: searchFilter, endRangeFilter: endRangeFilter, startRangeFilter: startRangeFilter, }); dispatch(aSetPostsList(response.posts)); dispatch(aSetTotalPostsCount(response.totalCount)); } catch (error) { console.error("Error fetching Posts:", error); dispatch(aPushNewNotification({ type: 'error', text: 'Failed to fetch Posts' })); } } - create new "filters" modal type with date pickers, status and language dropdowns, also we will add "Apply" and "Clear Filters" buttons, all these fields will modify data from storage, and the "Apply" button will call the same function that we are using on the search button (I will not copy-paste this component because that will be more than 200 lines of code, you can develop this feature by your own or check in my repo). In my case, it will look like this:

Serving Website With Express: A Beginner's Tutorial
Hey there! We've gone from making simple servers to playing with fancy MVC stuff in web development. Now, let's spice things up a bit – ever thought about serving a whole website with our friendly Express.js server? Today, we're going to chat about setting up servers, and learn how to easily serve a website. It's like taking a fun stroll through web development where we keep things simple but add a dash of magic to create awesome online experiences. Ready for the ride?What is Website Serving?Website serving refers to the process where a server delivers web content (such as HTML pages, images, CSS, and JavaScript files) to users' browsers upon request. This involves hosting files on a server and making them accessible over the internet, allowing users to access and view a website's content by typing in its URL or clicking a link. Essentially, it's the mechanism that allows users to see and interact with a website's information and resources. With simple words: we need to make our website files accessible for browsers.In our case, we will update our simple server so that on GET request it responds with the HTML file and all other needed files (styles, JS).How to Serve Website With Express?We will continue with our simple web server that we created and configured before. Here last version, but you can check all modifications in my web notes:const express = require('express'); const app = express(); const PORT = 3000; const usersRouter = require('./routes/users.router'); app.use(express.json()); app.get('/', (req, res) => { res.send('Hello, Express!'); }); app.use('/users', usersRouter); app.listen(PORT, () => { console.log(`Server is running on http://localhost:${PORT}`); }); Now, we need to create a test file. Let's add a new folder and call it "public", inside the "public" folder we will create an "index.html" file with a simple HTML template. Also, we will create an "images" folder and send simple images inside that folder. And that would be great to add some styles to our page and image.So here is my final "index.html":<!DOCTYPE html> <html lang="en"> <head> <meta charset="utf-8" /> <title>WebCraft Notes</title> <link rel="stylesheet" href="styles/styles.css" /> </head> <body> <h1>Hello World!</h1> <div> <img src="images/sunset.jpg" /> </div> </body> </html> Okay, inside our server file, we will remove the "app.get" method and add the express middleware that will serve static files under a particular path (in our case "public" folder).const express = require('express'); const app = express(); const PORT = 3000; const usersRouter = require('./routes/users.router'); app.use(express.json()); app.use('/', express.static('public')); app.use('/users', usersRouter); app.listen(PORT, () => { console.log(`Server is running on http://localhost:${PORT}`); }); Great, let's start our express server and check the result:

Exploring Express.js: A Guide to Routing and URL Parameters
Routing and handling parametrized routes are the backbone of server-side functionality, playing a pivotal role in directing traffic and managing dynamic URL paths. Our earlier exploration of Node.js routing lays the groundwork for transitioning into the realm of Express.js routing. Despite their similarities, Express introduces a more refined and intuitive routing system, simplifying the process of directing requests and enabling effortless parameter handling. Join us as we navigate through the fundamental concepts of Express routing, unveiling its power and simplicity for efficient server-side development.Express.js RoutingRouting in web development involves directing incoming HTTP requests to specific endpoints or handlers based on the requested URL and HTTP method. In Express.js frameworks, routing defines how an application responds to client requests by mapping URLs to particular controller functions or actions. That is what we gonna talk about in the first part of the article.We will start our work by using the simple Express server that we created in the previous post. Okay, I'll make a code copy over here for those who are too lazy to figure from the beginning.const express = require('express'); const app = express(); const PORT = 3000; app.get('/', (req, res) => { res.send('Hello, Express!'); }); app.listen(PORT, () => { console.log(`Server is running on http://localhost:${PORT}`); }); As you can see we have one route here "/" and if you visit that URL address you will see the "Hello Express!" message. Let's add another route: "/about" which will return a different message, and "/users" which will return an array of users that we will create previously.If we would use Node.js we should transform our users into JSON, but the response in Express has a "json()" method that will transform and send JSON. Awesome, right?! Here is what we have:const express = require('express'); const app = express(); const PORT = 3000; const users = [ { id: 1, name: 'John'}, { id: 2, name: 'Jane'}, { id: 3, name: 'Jim'}, ] app.get('/', (req, res) => { res.send('Hello, Express!'); }); app.get('/about', (req, res) => { res.send('About Page'); }); app.get('/users', (req, res) => { res.json(users); }); app.listen(PORT, () => { console.log(`Server is running on http://localhost:${PORT}`); }); Now we can use the "npm start" command to check the result in the "/about" and "/users" routes.
Final Touches: Prepping Your Nuxt.js E-Commerce Store for Production
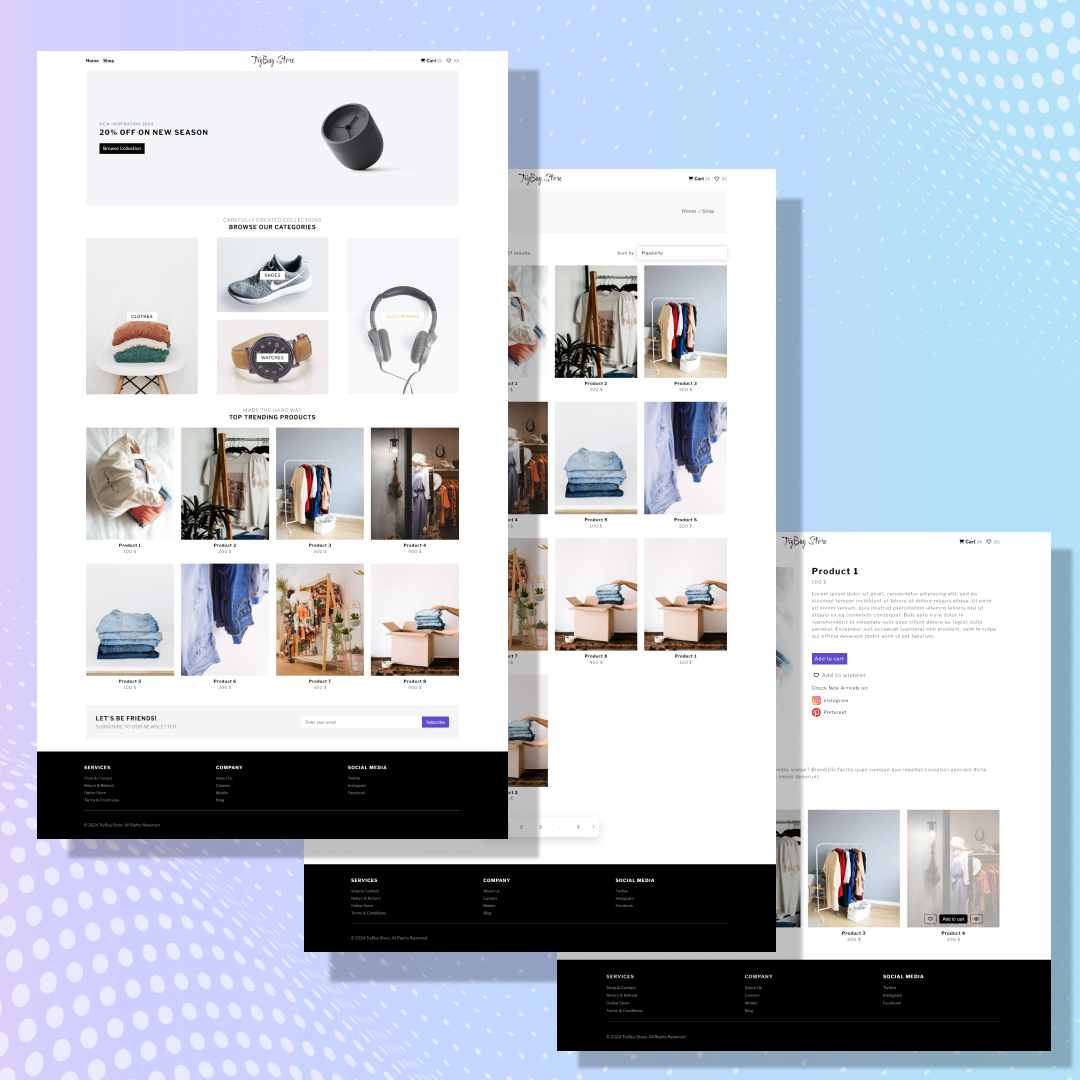
As we approach the finish line of building our Nuxt.js e-commerce store, we've successfully added all the necessary pages and functionality, as well as implemented meta tags for improved search engine optimization (SEO). However, there are still a few essential components and configurations we need to address before launching our online store.In this article, we'll focus on setting up the necessary configurations that will allow Nuxt.js to generate all our pages efficiently, ensuring optimal performance and search engine indexing. Additionally, we'll cover the implementation of crucial components such as breadcrumbs, empty cart notifications, and loader, which can enhance the user experience and provide valuable information to potential customers.Upgrading the e-commerce store's user experience (UX) with a dynamic Breadcrumbs componentAdding a Loader component to the Nuxt.js projectImplement Empty Cart and Wishlist Notifications with Image PlaceholdersBy breaking down the implementation process into these key components, we can methodically work through the necessary steps, ensuring that our Nuxt.js e-commerce store is not only functional but also offers a polished and user-friendly experience upon launch.1. Upgrading the e-commerce store's user experience (UX) with a dynamic Breadcrumbs componentWe had already created a "Breadcrumb" component and added it to the main pages, but it is the same on each page. Now we will work with props and modify Breadcrumbs so that its title is rendered depending on the page where it was added.Open a Breadcrumbs.vue file and add props to the script part, our props will accept an array of strings.props: { breadcrumbsList: { type: Array, required: true } } Then we need to modify our template, we need to update each item name and item link so that it is dynamically rendered for each page separately.<ul class="breadcrumbs__list"> <li class="breadcrumbs__list--item"> <NuxtLink to="/" class="breadcrumbs--link"> {{ breadcrumbsList[0] }} </NuxtLink> </li> <li class="breadcrumbs__list--item"> / </li> <li> <NuxtLink :to="`/${breadcrumbsList[1]}`" class="breadcrumbs--link"> {{ breadcrumbsList[1] }} </NuxtLink> </li> <li class="breadcrumbs__list--item" v-if="breadcrumbsList[2]"> / </li> <li v-if="breadcrumbsList[2]"> <NuxtLink :to="`/${breadcrumbsList[2]}`" class="breadcrumbs--link"> {{ breadcrumbsList[2] }} </NuxtLink> </li> </ul> Great, now we can open a Checkout page component and add props to the Breadcrumbs. We need to add an array with three items.<Breadcrumbs :breadcrumbsList="['Home', 'Cart', 'Checkout']" /> Now we need to update all our Breadcrumbs implementation at each page, then please, restart the dev server and check the result. You should have a Breadcrumb with working links, and we can move on.2. Adding a Loader component to the Nuxt.js projectA loader is a visual indicator that is displayed on a web page or application to signal that content or data is currently being loaded or processed. It provides users with feedback that the system is working and that they should wait for the desired content or action to complete.We will have a massive amount of data on the shop page, so it is crucial to show a loader while the user is waiting for the products list to render. I found an awesome free spinner loader on the css-loader website, I will use one from the list. Copy the spinner card HTML/CSS code, then inside the common folder create a new file Loader.vue, and add the HTML part of code into the template section and CSS into the styles section.<template> <div class="loader"></div> </template> <script> export default { name: "Loader" } </script> <style lang="scss" scoped> .loader { width: 50px; padding: 8px; aspect-ratio: 1; border-radius: 50%; background: #25b09b; --_m: conic-gradient(#0000 10%,#000), linear-gradient(#000 0 0) content-box; -webkit-mask: var(--_m); mask: var(--_m); -webkit-mask-composite: source-out; mask-composite: subtract; animation: l3 1s infinite linear; } @keyframes l3 {to{transform: rotate(1turn)}} </style> Now, we can import this Loader into the shop page, and show it till the list of products is empty, when we receive the products list we will remove the loader from the page.<div class="shop__content--loader" v-if="!productsStore.gProductsList.length"> <Loader /> </div> <div class="shop__content--products" v-if="productsStore.gProductsList.length"> ... </div> Great, we can restart the server and check our loader, there will be 1-2 seconds when we will see the loader before the products list appears.3. Implement Empty Cart and Wishlist Notifications with Image PlaceholdersNow, there are table headers only if our cart and wishlist are empty, it's not looking great, that is why we will add some sort of notification, we will show the user for example an empty cart image with the informative title and link to the shop page.I found some pretty free images of empty carts and empty buskets in the freepik service and I will use them. Open the wishlist page component and create an additional empty section that will be shown only if the products list is empty. That empty section will have an image, a simple subtitle, and a button that will redirect the user to the shopping page.<section class="cart__empty" v-if="!productsList.length"> <h3>Your wishlist is empty</h3> <img class="cart__empty--image" src="../../assets/images/cart/empty-wishlist.png" alt="Cart Empty"> <button class="cart__footer--btn" @click="$router.push('/shop')"> <NuxtIcon name="arrow-left-long-solid" size="20" class="cart__footer--icon"/> Continue Shopping </button> </section> <section class="cart__content" v-else> ... </section> The same settings we will implement to the cart and the wishlist pages. Then we need to restart our dev server once again and check the result.
_235b56f7-1703-4b6a-9d2c-984ac0ede7fe.png?alt=media&token=0ba59dc3-8ba9-496d-88d3-006f7273839d)
React and Node.js CMS Series: Finish Line
We've reached the culmination of our journey—a full-stack Content Management System built with React and Node.js. Through a series of carefully crafted tutorials, we've transformed conceptual ideas into a feature-rich application that not only demonstrates web development techniques but also serves as a showcase of modern JavaScript ecosystem capabilities. What began as a series of incremental steps has now evolved into a platform that integrates complex functionalities like CRUD operations, post management, search, filtering, and pagination.In this article, we still have some jobs to do, we will configure CORS, PM2, and auth protection middleware.1. Fortifying Our Application: CORSCORS (Cross-Origin Resource Sharing) is a security feature in web browsers that restricts web pages from requesting a domain different from the one that served them unless explicitly allowed by the server. It is implemented via HTTP headers, enabling servers to control which origins, methods, and headers are permitted for cross-origin requests.Luckily we have CORS module.- open our "server" folder, and use "npm i cors" to install new module;- create new "cors.js" file inside the "server" folder;- create an array "whiteList" for example, that will store our allowed domains;- add a new "CorsOptions" checker that will run at each request and dynamically compare domain with "whiteList" and return the result;var whitelist = [ 'http://localhost:5173', ] var corsOptions = { origin: function (origin, callback) { if (whitelist.indexOf(origin) !== -1) { callback(null, true) } else { callback(new Error('Not allowed by CORS')) } } } module.exports = corsOptions; - export "CorsOptions" ;- inside the "app.js" file import "CorsOptions", and "cors";const corsOptions = require('./cors'); const cors = require('cors'); - apply the CORS policy to all incoming requests, ensuring only allowed requests pass through;app.use(cors(corsOptions)); Great, now we can control the allowed domains.2. Fortifying Our Application: Auth Protection MiddlewareWe added CORS protection, to secure our app from external requests, but also we would like to protect our data from unauthorized users, for that task, we will create an "auth" checker middleware.- create a new "auth.js" file inside the "middleware" folder;- import the "jwt" module, and our "users" model;const jwt = require('jsonwebtoken'); const usersModel = require('../models/users/users.model'); - export "protect" checker, which will get the token from the request, verify it, then check the user from the database (for example if the user has permission), and return some response (usually allowing to use of data or not);exports.protect = async (req, res, next) => { let token; if (req.headers.authorization && req.headers.authorization.startsWith('Bearer')) { token = req.headers.authorization.split(' ')[1]; } if (!token) { return res.status(401).json({ message: "You are not logged in! Please log in to get access" }); } const decoded = jwt.verify(token, process.env.JWT_SECRET); const currentUser = await usersModel.findUserById(decoded.id); if (!currentUser) { return res.status(401).json({ message: "The user belonging to this email does not exist" }); } req.user = currentUser; next(); }; - import our "protector" middleware into the routes folder and add this after the route name, to protect that route;const { protect } = require('../../middleware/auth'); postsRouter.get('/', protect, postsController.getPostsList); postsRouter.get('/:slug', protect, postsController.getPostBySlug); postsRouter.post('/create', protect, postsController.createNewPost); postsRouter.post('/update', protect, postsController.updatePost); postsRouter.post('/post-image', protect, postsController.uploadPostImage); postsRouter.post('/remove-image', protect, postsController.deletePostImage); postsRouter.post('/remove', protect, postsController.removePost); Nice, we configured an additional protector for our routes, next we will set a process manager.3. Fortifying Our Application: dotenv"dotenv" is a Node.js package that loads environment variables from a .env file into process.env, allowing you to store sensitive configuration details like API keys, database URLs, and ports securely. This helps keep credentials out of the source code, making applications more secure and easier to configure across different environments. It is commonly used in applications to manage environment-specific settings, and we will implement "dotenv" into our app also.- use the "npm i dotenv dotenv-safe" command in our "server" folder;- import and use "dotenv" options inside the "server.js" file;require('dotenv').config(); - inside the "app.js" file import "dotenv", and check the application environment, if "production" we will return one type of configs, and if "development" then another;if (process.env.NODE_ENV === 'production') { dotenv.config({ path: path.resolve(__dirname, '../.env.production'), example: path.resolve(__dirname, '../.env.example'), allowEmptyValues: true, }); } else { dotenv.config({ path: path.resolve(__dirname, '../.env.development'), example: path.resolve(__dirname, '../.env.example'), allowEmptyValues: true, }); } - we need to create 2 files: ".env.development" and ".env.production" which will store variables for different environments; For example:ENVIRONMENT=production PORT=8443 Let's move on.4. Preparing for Production: PM2PM2 is a process manager for Node.js applications that allows you to run, monitor, and manage multiple Node.js processes with features like automatic restarts, logging, and clustering. In other words, it's a "nodemon" but more complicated (it will run your server all the time, in few threads, and will not stop if there are errors, "simple errors").- use the "npm i pm2" command in the server console, to install PM2 module;- open the "package.json" config file, and add new scripts to control the PM2 services; "start-dev": "pm2 start src/server.js --env development", "start": "pm2 start src/server.js --env production", "stop": "pm2 stop src/server.js", "restart": "pm2 reload src/server.js" - we need to modify our "server.js" file;const cluster = require('cluster'); const http = require('http'); const numCPUs = require('os').cpus().length; // cluster: Enables the server to use multiple CPU cores by creating worker processes. // http: Creates an HTTP server (instead of HTTPS). // os.cpus().length: Gets the number of CPU cores available to fork worker processes require('dotenv').config(); const app = require('./app'); const mongo = require('./services/mongo'); const PORT = process.env.PORT || 8443; // dotenv.config(): Loads environment variables from a .env file into process.env. // app: Imports the Express application. // mongo: Imports the MongoDB connection service. // PORT: Reads the port number from the .env file or defaults to 8443 if (cluster.isMaster) { console.log(`Master ${process.pid} is running`); for (let i = 0; i < numCPUs; i++) { cluster.fork(); } cluster.on('exit', (worker, code, signal) => { console.log(`Worker ${worker.process.pid} died`); }); // if (cluster.isMaster): - Runs only in the master process. - Forks worker processes equal to the number of CPU cores using cluster.fork(), allowing the server to handle multiple requests concurrently. - Listens for worker exits and logs when a worker dies. } else { async function startServer() { await mongo.mongoConnect(); const server = http.createServer(app); server.listen(PORT, () => { console.log(`Worker ${process.pid} listening on :${PORT}...`); }); } startServer(); // Each worker process: - Connects to MongoDB using mongo.mongoConnect(). - Creates an HTTP server using http.createServer(app), making the Express app handle requests. - Starts listening on PORT, logging the worker process ID. } In simple words: we are checking the CPU cores and threads and listening to the events at each worker process to handle incoming requests, while the master process manages and restarts workers if they fail.- use the "npm run start" command to start the PM2 server in the background, and check the console, where you'll see a forks table, something like this:

How to Add a QR Code Scanner in Vue.js (Step-by-Step Guide)
QR codes have become incredibly useful in modern applications. Instead of typing information manually, users can simply scan a QR code to instantly retrieve data.In one of my recent projects, I was tasked with integrating a QR code scanner into a store management system to scan QR codes on clothing items and display their details. In this article, I’ll share how I implemented a QR code scanner in a Vue.js project, along with tips and code examples to help you do the same.1. What is a QR code Scanner?A QR code scanner is a tool (hardware or software) that reads and interprets QR codes — the square-shaped barcodes often seen on packaging, websites, tickets, and more.A QR code (Quick Response code) is a type of 2D barcode that stores information such as: URLs, Text, Product details, Contact information, Event info, Wi-Fi credentials...A QR code scanner:- Detects a QR code using a device’s camera (e.g., on a phone or laptop);- Decodes the QR code into readable data;- Processes that data — for example, opening a URL or displaying info;In a Vue.js project, a QR code scanner is a JavaScript-based component that:- Accesses the user’s camera (via getUserMedia);- Detects and decodes QR codes;- Triggers an action with the scanned data;2. Install a QR code Scanner into your Vue js ApplicationWe will use the "vue-qrcode-reader" set of Vue.js components for the QR code reader, for that you can simply use an "npm i vue-qrcode-reader" command in your terminal, in another way you need to start a new Vue.js project.- start new Vite project "npm create vite@latest";- choose Vue.js as a template and set the project name;- use a "npm i vue-qrcode-reader" command, to install the QR scanner;I will also use Vuetify, just for faster build of our test page.3. Build a Vue.js QR code Scanner component - create a new "QRScanner.vue" component inside;- import "QrcodeStream" from "vue-qrcode-reader";- add a "mounted" lifecycle hook, where we will get information about our media devices (cameras), and store it in the component state;async mounted() { try { const stream = await navigator.mediaDevices.getUserMedia({ video: true }); stream.getTracks().forEach(track => track.stop()); const devices = await navigator.mediaDevices.enumerateDevices(); this.devices = devices.filter(({ kind }) => kind === 'videoinput'); if (this.devices.length > 0) { this.selectedDevice = this.devices[0]; } } catch (error) { console.error('Error accessing camera:', error); } } - create a main component template, that will check devices, and if a device exists load it. We will add a button that will change the device (because there could be 2 or more available cameras);- add "QrCodeSctream" component with additional attributes: constraints - sets specific camera constraints (like which camera to use), track - allows you to define a custom function to draw something on top of the video stream (e.g., a square or outline around the detected QR code), error - handles errors during camera access or scanning, detect - triggered when a QR code is successfully detected and decoded.- and let's add a subheader, that will show decoded QR code data;<template> <v-container> <v-row class="d-flex flex-column align-center justify-center"> <h3 v-if="error" class="error-text">{{ error }}</h3> <h3 v-if="!selectedDevice" class="error-text">Loading...</h3> <v-btn v-if="devices.length > 1" color="light-blue-darken-1" @click="changeCamera"> {{ $t('changeCamera') }} </v-btn> <v-col cols="12" sm="6"> <QrcodeStream :constraints="{ deviceId: selectedDevice.deviceId }" :track="paintOutline" @error="onError" @detect="onDetect" v-if="selectedDevice !== null" /> </v-col> </v-row> <v-row class="d-flex flex-column align-center justify-center"> <v-col cols="12" sm="6"> <h3 v-if="qrCode" class="error-text">QR Code: {{ qrCode }}</h3> </v-col> </v-row> </v-container> </template> - in the "script" section we need to add data that will return our QR code, the "paintOutline" method to draw a red square around the QR code in the camera, "changeCamera" to select the camera we need, "onError", and "onDetect" methods to react on qr code detects;components: { QrcodeStream }, data() { return { error: null, qrCode: null, devices: [], selectedDevice: null, } }, methods: { paintOutline(detectedCodes, ctx) { for (const detectedCode of detectedCodes) { const [firstPoint, ...otherPoints] = detectedCode.cornerPoints ctx.strokeStyle = 'red' ctx.beginPath() ctx.moveTo(firstPoint.x, firstPoint.y) for (const { x, y } of otherPoints) { ctx.lineTo(x, y) } ctx.lineTo(firstPoint.x, firstPoint.y) ctx.closePath() ctx.stroke() } }, onError(err) { this.error = `[${err.name}]: ` if (err.name === 'NotAllowedError') { this.error = 'you need to grant camera access permission' } else if (err.name === 'NotFoundError') { this.error = 'no camera on this device' } else { this.error = err.message } }, onDetect(detectedCodes) { const code = JSON.stringify(detectedCodes.map((code) => code.rawValue)); this.qrCode = code.replace(/[\[\]"]/g, ''); }, changeCamera() { if (this.devices.length > 1) { const index = this.devices.findIndex( (device) => device.deviceId === this.selectedDevice.deviceId ) index === 0 ? this.selectedDevice = this.devices[1] : this.selectedDevice = this.devices[0] } } } Now, let's launch our application and check the result. After camera launch you can generate a qr code and try by your own.
Don't Miss Out!
Subscribe to our newsletter to get the latest articles. No adds, no spam, just the good stuff.