

How to Add a QR Code Scanner in Vue.js (Step-by-Step Guide)
QR codes have become incredibly useful in modern applications. Instead of typing information manually, users can simply scan a QR code to instantly retrieve data.In one of my recent projects, I was tasked with integrating a QR code scanner into a store management system to scan QR codes on clothing items and display their details. In this article, I’ll share how I implemented a QR code scanner in a Vue.js project, along with tips and code examples to help you do the same.1. What is a QR code Scanner?A QR code scanner is a tool (hardware or software) that reads and interprets QR codes — the square-shaped barcodes often seen on packaging, websites, tickets, and more.A QR code (Quick Response code) is a type of 2D barcode that stores information such as: URLs, Text, Product details, Contact information, Event info, Wi-Fi credentials...A QR code scanner:- Detects a QR code using a device’s camera (e.g., on a phone or laptop);- Decodes the QR code into readable data;- Processes that data — for example, opening a URL or displaying info;In a Vue.js project, a QR code scanner is a JavaScript-based component that:- Accesses the user’s camera (via getUserMedia);- Detects and decodes QR codes;- Triggers an action with the scanned data;2. Install a QR code Scanner into your Vue js ApplicationWe will use the "vue-qrcode-reader" set of Vue.js components for the QR code reader, for that you can simply use an "npm i vue-qrcode-reader" command in your terminal, in another way you need to start a new Vue.js project.- start new Vite project "npm create vite@latest";- choose Vue.js as a template and set the project name;- use a "npm i vue-qrcode-reader" command, to install the QR scanner;I will also use Vuetify, just for faster build of our test page.3. Build a Vue.js QR code Scanner component - create a new "QRScanner.vue" component inside;- import "QrcodeStream" from "vue-qrcode-reader";- add a "mounted" lifecycle hook, where we will get information about our media devices (cameras), and store it in the component state;async mounted() { try { const stream = await navigator.mediaDevices.getUserMedia({ video: true }); stream.getTracks().forEach(track => track.stop()); const devices = await navigator.mediaDevices.enumerateDevices(); this.devices = devices.filter(({ kind }) => kind === 'videoinput'); if (this.devices.length > 0) { this.selectedDevice = this.devices[0]; } } catch (error) { console.error('Error accessing camera:', error); } } - create a main component template, that will check devices, and if a device exists load it. We will add a button that will change the device (because there could be 2 or more available cameras);- add "QrCodeSctream" component with additional attributes: constraints - sets specific camera constraints (like which camera to use), track - allows you to define a custom function to draw something on top of the video stream (e.g., a square or outline around the detected QR code), error - handles errors during camera access or scanning, detect - triggered when a QR code is successfully detected and decoded.- and let's add a subheader, that will show decoded QR code data;<template> <v-container> <v-row class="d-flex flex-column align-center justify-center"> <h3 v-if="error" class="error-text">{{ error }}</h3> <h3 v-if="!selectedDevice" class="error-text">Loading...</h3> <v-btn v-if="devices.length > 1" color="light-blue-darken-1" @click="changeCamera"> {{ $t('changeCamera') }} </v-btn> <v-col cols="12" sm="6"> <QrcodeStream :constraints="{ deviceId: selectedDevice.deviceId }" :track="paintOutline" @error="onError" @detect="onDetect" v-if="selectedDevice !== null" /> </v-col> </v-row> <v-row class="d-flex flex-column align-center justify-center"> <v-col cols="12" sm="6"> <h3 v-if="qrCode" class="error-text">QR Code: {{ qrCode }}</h3> </v-col> </v-row> </v-container> </template> - in the "script" section we need to add data that will return our QR code, the "paintOutline" method to draw a red square around the QR code in the camera, "changeCamera" to select the camera we need, "onError", and "onDetect" methods to react on qr code detects;components: { QrcodeStream }, data() { return { error: null, qrCode: null, devices: [], selectedDevice: null, } }, methods: { paintOutline(detectedCodes, ctx) { for (const detectedCode of detectedCodes) { const [firstPoint, ...otherPoints] = detectedCode.cornerPoints ctx.strokeStyle = 'red' ctx.beginPath() ctx.moveTo(firstPoint.x, firstPoint.y) for (const { x, y } of otherPoints) { ctx.lineTo(x, y) } ctx.lineTo(firstPoint.x, firstPoint.y) ctx.closePath() ctx.stroke() } }, onError(err) { this.error = `[${err.name}]: ` if (err.name === 'NotAllowedError') { this.error = 'you need to grant camera access permission' } else if (err.name === 'NotFoundError') { this.error = 'no camera on this device' } else { this.error = err.message } }, onDetect(detectedCodes) { const code = JSON.stringify(detectedCodes.map((code) => code.rawValue)); this.qrCode = code.replace(/[\[\]"]/g, ''); }, changeCamera() { if (this.devices.length > 1) { const index = this.devices.findIndex( (device) => device.deviceId === this.selectedDevice.deviceId ) index === 0 ? this.selectedDevice = this.devices[1] : this.selectedDevice = this.devices[0] } } } Now, let's launch our application and check the result. After camera launch you can generate a qr code and try by your own.

Building Simple CRM with Vue: Crafting Layouts and Navigation
Now that we've successfully completed the preliminary installations, it's time to embark on the exciting journey of building our CRM with Vue. The question is, where do we begin? The answer lies in the fundamentals — navigation, headers, and layouts. These essential elements will form the cornerstone of our main "Dashboard" page, seamlessly integrated into our router configuration. Let's outline a concise plan to guide us through the next steps:1.Layouts: Unveiling the What, Why, and How: Delve into the significance of layouts – what purpose they serve, why they matter, and how to craft them effectively.2. Initiate the "Dashboard" Page:Start by creating the foundational "Dashboard" page, setting the stage for our CRM's central hub.3. CRM Navigation: Crafting a Sidebar: Explore the intricacies of CRM navigation, focusing on the creation of a user-friendly sidebar.As we progress through each step, we'll unravel the art of crafting layouts and navigation in Vue, ensuring a robust foundation for our Simple CRM. Stay tuned for practical insights and step-by-step guidance as we navigate the world of Vue.js development.1. Layouts: What and Why do We Need Layouts?A layout in web development refers to the structural arrangement of visual elements on a webpage, defining the positioning and organization of content. It establishes the overall framework, including the placement of headers, footers, navigation bars, and other components, ensuring a cohesive and user-friendly design.In simple words, a layout is a web page background where we position all elements. For example with our simple CRM, we will need two layouts: the first or main layout for all our pages which will contain a header, sidebar, menu, and maybe a footer; the second one, an empty layout for the login page and maybe a 404 page.1.1 How to add layout to Vue project?It will be clearer when we create and use layouts in practice. So let's do it:Inside our project create a "layouts" folder and a "MainLayout.vue" file. It will be the layout for our main app pages, so we need to add "Header" for start, and "RouterView" (the place where our 'children' routes will be rendering). Also, inside the "components" folder create another folder "navigation" and add a "Header" file with some empty template. That's it:<template> <main> <Header /> <RouterView /> </main> </template> <script> import { RouterView } from 'vue-router'; import Header from '@/components/navigation/Header.vue'; export default { name: 'MainLayout', components: { Header, } }; </script> Now, we need to update our main "App.vue" file. Remove "Router" because all routes control is inside the layout and import our "MainLayout" into the App component.<template> <MainLayout /> </template> <script> import MainLayout from '@/layouts/MainLayout.vue'; export default { name: 'App', components: { MainLayout } } </script> We need to improve our route configurations, we will add the first route and nested routes as its children.import { createRouter, createWebHistory } from 'vue-router'; import Dashboard from '../views/Dashboard.vue'; const router = createRouter({ history: createWebHistory(import.meta.env.BASE_URL), routes: [ { path: '/', children: [ { path: '', component: Dashboard, }, ] }, ] }) export default router If you need to get more details about "Vue Router" you can check my articles about that.Now, we can launch our development server (npm run dev) and check the result:
Full-Stack Blogging CMS: A 17-Part Journey
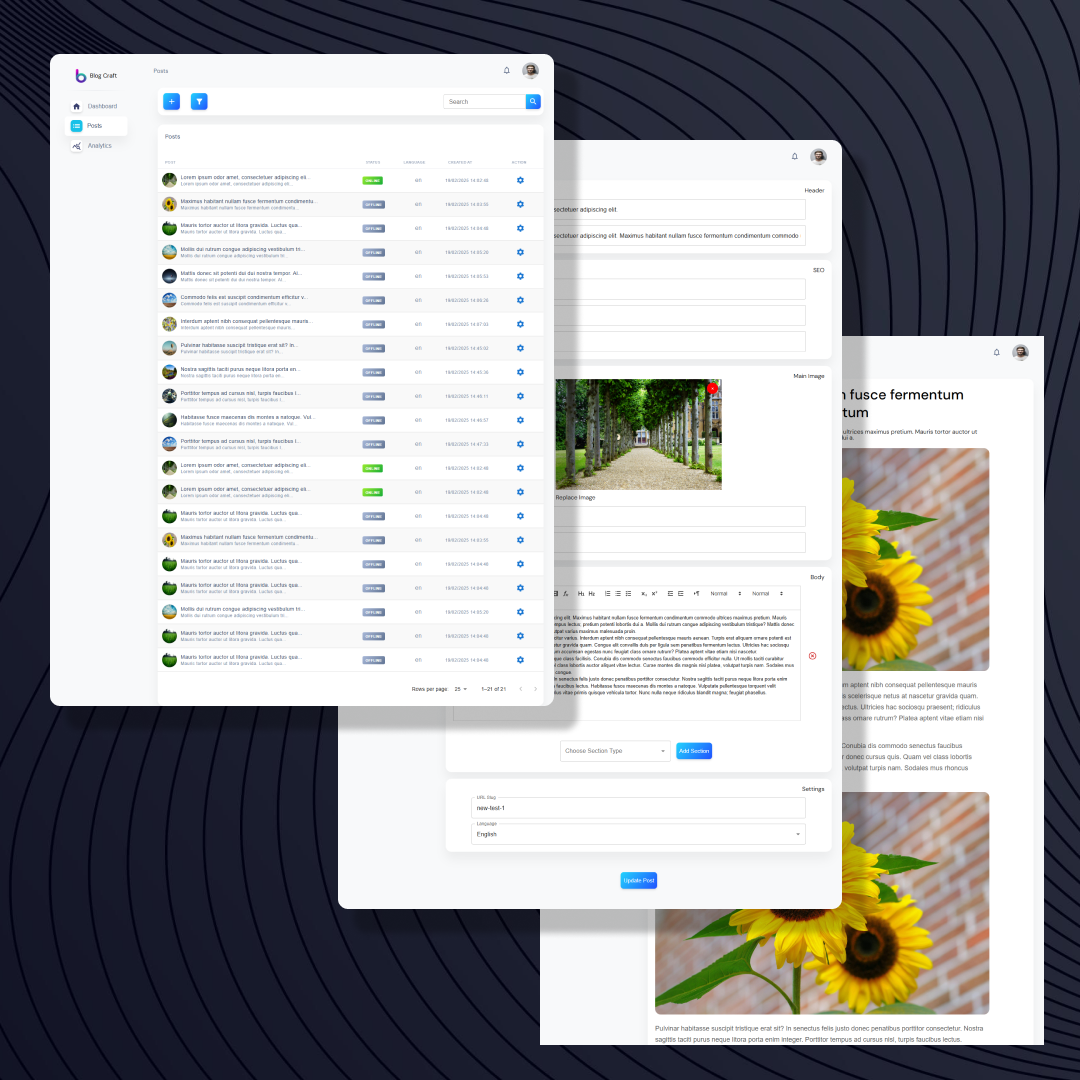
In this summary, we revisit our step-by-step journey in developing a full-stack blogging CMS from scratch using React.js and Node.js. Across 17 detailed parts, each tutorial piece builds upon the previous one, guiding you through everything from setting up the initial project architecture to implementing advanced features like authentication, CORS configuration, and process management with PM2. This series not only demonstrates modern web development best practices but also delivers practical insights into creating a secure and scalable content management platform. Below, you will find a detailed breakdown of each tutorial part, along with direct links to explore the individual articles.1. Let's Develop a Fullstack Blogging CMS from Scratch using React.js and Node.jsIn this article, we kick off a new series by laying the groundwork for building a dynamic blogging CMS using React.js and Node.js. The post outlines our project vision, covering everything from design exploration and project structure to selecting a technology stack featuring React, Redux, Express, and MongoDB. You’ll discover how thoughtful planning and carefully selected libraries can streamline both frontend and backend development. Whether you're enhancing your portfolio or sharpening your development skills, this introductory guide sets the primary stage for a modern web development.2. Build Content Management System with React and Node: Beginning Project SetupIn this article, we set the stage by installing and configuring all the essential dependencies for our project. You'll learn how to quickly scaffold the front-end with Vite, integrating React, Redux, React Router, Sass, and Material UI for a solid user interface foundation. On the back-end, we launch a Node.js server with Express and Nodemon for seamless development. This guide ensures that your development environment is fully prepped and functional.3. Building a React CMS: Fonts, SCSS Resets, and Layout ImplementationIn this article, we enhance our React CMS by setting up custom fonts, implementing SCSS resets, and constructing main layout. We start by importing and configuring 'Roboto' fonts from Google Fonts to ensure consistent typography, followed by applying reset styles to neutralize browser defaults. Next, we build a reusable layout that features a dynamic header and sidebar, facilitating streamlined routing and navigation across CMS pages. With these foundational elements in place, the stage is set for integrating more advanced features in our upcoming posts.4. Structuring the Server: Node.js, MongoDB, and User Models for Our CMSIn this article, we focus on structuring our Node.js backend and establishing a solid connection to MongoDB for our CMS project. We begin by organizing our server-side code into clear modules, including routes, controllers, models, and schemas, ensuring a scalable and maintainable foundation. Next, we demonstrate how to set up a basic user model with an associated schema and create the necessary routes to manage user-related operations. Finally, we illustrate the process of connecting our server to a MongoDB database.5. Building a Complete User Registration System with React and Node.jsIn this article, we build a complete user registration system for our Blog CMS, starting with designing an elegant registration page using a custom empty layout for authentication routes. We guide you through setting up a responsive registration form in React and establishing API communication with the Node.js backend. On the server side, the tutorial covers encrypting passwords using bcrypt, creating new user records, and ensuring unique email registrations while generating secure tokens. This guide lays a foundation for user management in our CMS and sets the stage for integrating login functionality in upcoming posts.6. Login Logic: Building User Authentication for Your CMSIn this article, we implement a secure login system for our CMS by building a responsive login form in React and developing corresponding authentication endpoints in Node.js. The tutorial walks through capturing user credentials, verifying them against stored data, and leveraging JWT for secure session management on the backend. We detail every step from integrating API communication on the frontend to encrypting and validating credentials on the server. This guide not only complements our previous registration process but also provides a strong foundation for user authentication within our CMS.7. Redux Integration: Enhancing Your Node.js and React CMSIn this article, we integrate Redux into our CMS project to enhance state management and streamline data flow across our React application. We start by setting up Redux utilities, including a helper for creating actions and structuring a dedicated store for authentication data. The tutorial walks through establishing action types, reducers, actions, and selectors, followed by integrating the Redux store with our React app via the Provider. Finally, we demonstrate how to dispatch actions—in this case, updating user state during the login process—illustrating Redux’s role in managing complex UI states for our growing CMS.8. Enhancing User Experience: Implementing Notifications, Modals and Loaders in a React-based CMSIn this article, we enhance our CMS's user experience by implementing new UI components, including a dynamic notification system and a sleek loader. The tutorial details setting up Redux to manage global notifications and modals, providing instant feedback with success, error, or warning messages. We then build a reusable modal system to flexibly display various interactive elements and integrate a loader component that offers visual cues during asynchronous operations. These improvements significantly boost CMS's interface usability and responsiveness.9. React and Node.js CMS Series: Implementing Post Lists with Advanced Table FeaturesIn this tutorial, we transform the static Posts page of our CMS into an interactive data management interface by building a feature-rich posts table in React. We walk through crafting a dynamic table component complete with post details, pagination, and actions such as edit, preview, and status changes, as well as setting up frontend data fetching and Redux state management. On the backend, we create the necessary API routes and controllers in Node.js to efficiently return post data from our database. This approach provides a solution for managing and displaying posts, and defining the way for future enhancements like sorting and filtering.10. Content Management System: Building a Post Creation System from Scratch with Node jsIn this guide, we build the core backend functionality for post creation in our CMS by setting up a MongoDB schema and the necessary API infrastructure using Node.js and Express. We outline the process of designing a flexible post model, developing a service layer for saving posts, and establishing secure API endpoints to handle post creation requests. The tutorial also details the creation of a controller with proper error handling to ensure a smooth data flow between the frontend and the database. With this strong backend foundation in place, the stage is set for integrating an intuitive post creation interface on the frontend in the next article.11. React Post Creation Form: Building the Frontend for Your Content Management SystemIn this guide, we build a React-based post creation interface that integrates with our CMS backend. We start by configuring a dedicated route and crafting a user-friendly posts action section with clear navigation, then dive into designing a detailed post form that covers all essential fields from our MongoDB schema. The tutorial covers dynamic form handling including text inputs, meta fields, and a versatile body section with a rich text editor and image uploader placeholders. Although advanced media handling will be enhanced in future articles, this setup lays the groundwork for a full-featured post editor.12. Integrating Quill Editor and Image Upload Functionality in a React CMSIn this article, we integrate powerful content creation tools into our React-based CMS by implementing a rich text editor and a custom image uploader. We start with Quill Editor, setting up a dedicated component with custom toolbar configurations and dynamic event handling to support flexible formatting. Next, we build a reusable ImageUploader that features both drag-and-drop and click-to-upload functionalities, complete with image previews and metadata support. These components are designed for reusability across the entire CMS and lay the foundation for advanced post-editing capabilities in future updates.13. Node.js Image Upload System: File Handling, Storage, and Database IntegrationIn this tutorial, we build a server-side image management system using Node.js to complement our client-side image upload functionality in our CMS. We begin by setting up routes, controllers, and configuring Multer for handling multipart/form-data, ensuring that images are properly stored and their metadata managed. Next, we implement an endpoint for image deletion, allowing removal of uploaded files from the server. Finally, we integrate these endpoints into our frontend workflow, modifying the post creation process to handle main and additional image uploads, thereby providing a solution for image handling in the CMS.14. React and Node.js CMS Series: Implementing Advanced Post Editing FunctionalityIn this tutorial, we continue developing our React + Node.js CMS by implementing post-editing functionality. We'll start by setting up new backend routes and controllers to fetch, update, and remove posts using a "slug" identifier. Then, we'll enhance the frontend by integrating an edit button in the post list, redirecting users to a dynamic post form that fetches and pre-fills post data. Using Redux, we'll track changes and manage post updates. By the end, our CMS will support post modifications, making content management more flexible and user-friendly.15. CMS Development: Adding Post Preview and Status Management in React and Node.jsIn this article, we enhance our CMS by adding a dynamic post preview mechanism and a status management system. The new preview feature allows content creators to review posts in detail before publication, ensuring their content appears exactly as intended. Simultaneously, the status control system provides precise management over post visibility, allowing activation or deactivation of content through a partial update mechanism. Together, these features not only improve user experience but also lay the foundation for further extensible enhancements in our CMS architecture.16. Smart Content Management: Integrating Search, Filters, and Pagination with React and Node.jsIn this tutorial, we've enhanced our CMS by adding advanced search, filtering, and pagination functionalities. The backend has been updated to handle dynamic queries, enabling the retrieval of posts based on search keywords, filters like status and language, and controlled pagination. On the frontend, integration with Redux and the MUI TablePagination component ensures user interaction with these new features. Together, these improvements transform our CMS into a more user-friendly platform, demonstrating how modern technologies can be used to streamline content management.17. React and Node.js CMS Series: Finish LineIn the final chapter of our CMS journey, we bring together advanced backend configurations and production-readiness features to complete our full-stack application. This article details how to implement essential security and deployment enhancements, including CORS for controlled domain access, authentication middleware to safeguard routes, and environment management with dotenv. Additionally, we set up PM2 to manage our Node.js server processes, ensuring our app runs smoothly in production environments. This guide not only reinforces modern web development practices but also provides a blueprint for deploying secure, scalable, and resilient applications.This series guiding you from basic project architecture to a feature-rich, production-ready CMS. Each step built meaningful skills—from integrating rich content editors and dynamic image handling to ensuring security and scalability with advanced middleware and process management. The journey not only highlights modern JavaScript best practices but also lays a blueprint for creating secure, efficient, and user-friendly web applications. We hope this series inspires you to keep innovating and expanding your development toolkit.Thank you for being with us on this journey; see you in the next tutorials.
Pinia.org - A Culinary Hub
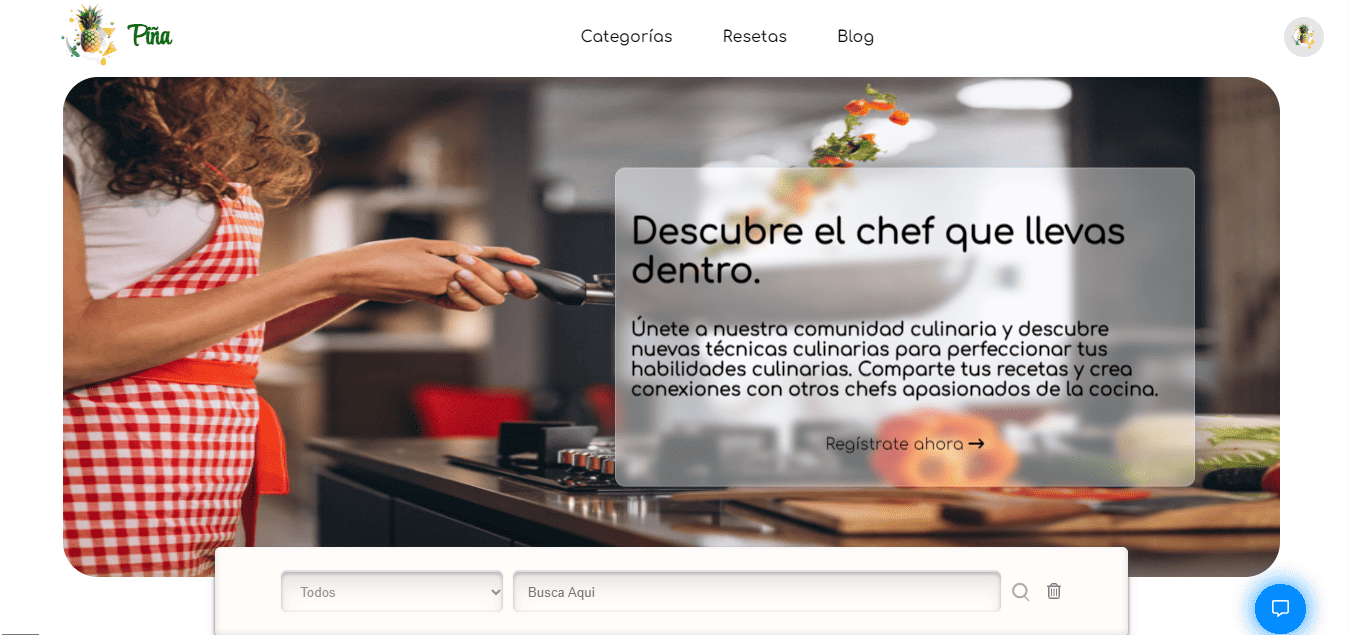
Pinia.org offers a seamless culinary experience, enabling users to register, log in, create, and edit recipes, alongside maintaining their personal cooking blogs. The platform fosters a sense of community through recipe sharing, liking, and commenting, enriching the culinary journey for all.
Key Features:
- User-Centric Profiles: Users can customize their profiles, showcase personal recipes, liked dishes, and update their information.
- Recipe and Blogging: Crafting and editing recipes is a breeze, while personal cooking blogs let users share their culinary passion.
- Interactive Recipe Pages: Engaging recipe pages feature images and step-by-step instructions for an immersive cooking experience.
- Content Creation: Create and edit recipes and blog posts seamlessly.